Adding a VoiceThread activity to your course
The first step to using VoiceThread in your course is to add a link to a module, content area, or page. This is a little bit different in every learning management system. Please find yours below for specific instructions.
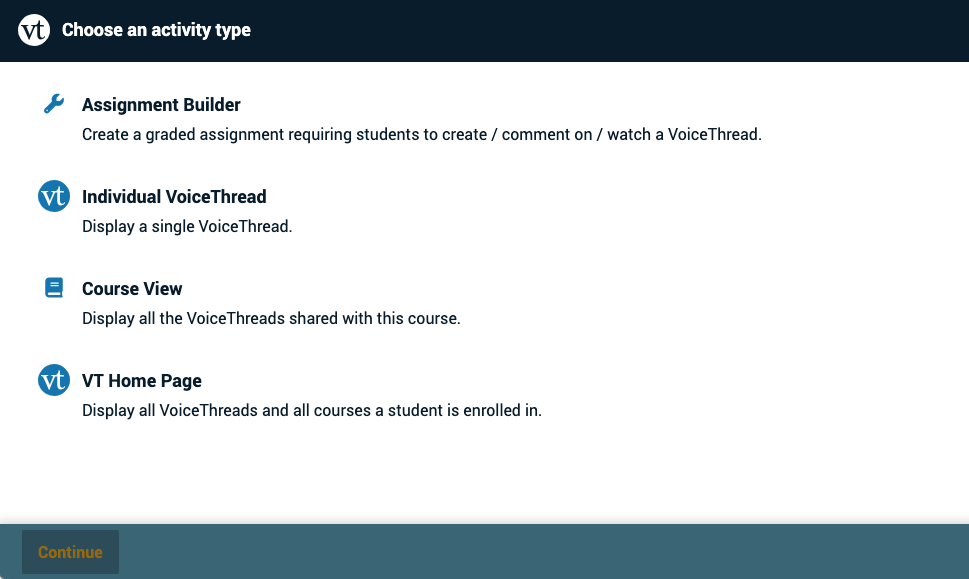
After you have created an activity link in your course, you’ll see the “Choose activity type” page so you can select the type of activity you’d like to set up Visit the instructor support page for details about each of these activity options.
Blackboard
Bb Learn: If your institution uses Deep Linking:
- Navigate to the “Content” area for your course.
- Click on the “Build Content” or “Tools” menu.
- Select “VoiceThread” from that menu.
This will launch the VoiceThread Setup Page. Proceed to the instructor support page for details about what comes next.
Bb Learn: If your institution does NOT use Deep Linking:
- Navigate to the “Content” area for your course.
- Click on the “Build Content” or “Tools” menu.
- Select “VoiceThread” from the menu.
- Give the link a title and description if you’d like.
- If you will be creating a graded assignment, remember to enable grading. This option may be called “Enable Evaluation” or “Enable Outcomes” depending on how your Blackboard is set up.
- Submit.
- Click on the new link you’ve just created, and proceed to the instructor support page for details about what comes next.
Bb Ultra
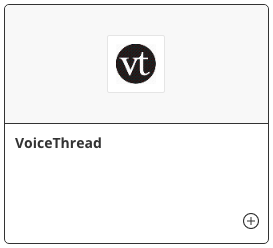
- Click on the + button wherever you would like to add your VoiceThread link.

- Select “Tools” or “Content Market” from the list of options. The wording will depend on your version of Blackboard.
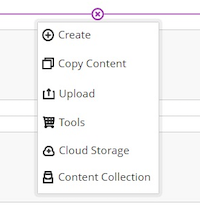
- Find “VoiceThread” in your list of tools. Note: If you are not using Deep Linking, it is important to click the + icon instead of the VT logo. If you do not see the + icon, just clicking the VT logo is fine.
- Edit the link you just created to customize the title, description, and publishing settings. If this is a graded assignment, make sure you check the box to “Create gradebook entry for this item”.

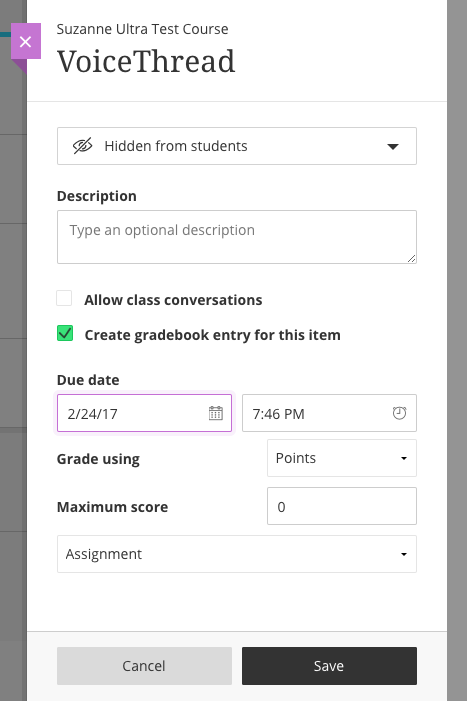
- Save.
- Click on the new link you’ve just created, and proceed to the instructor support page for details about what comes next.
Canvas
If your institution uses Deep Linking
Modules section
- Navigate to the “Modules” area of you course.
- Find the module to which you’d like to add VoiceThread, and click the “Add Content” button.
- Select “External Tool” from the menu.
- Select “VoiceThread” from the list of tools.
This will launch the VoiceThread Setup Page. Proceed to the instructor support page for details about what comes next.
Assignments section
- Navigate to the “Assignments” area of your course.
- Create a new assignment.
- Name the assignment and write a description if you choose.
- Under Submission Type, select “External Tool”.
- Click on the “Find” button.
- Click on “VoiceThread.”
This will launch the VoiceThread Setup Page. Proceed to the instructor support page for details about what comes next.
If your institution does NOT use Deep Linking
Non-graded activities
- Navigate to the “Modules” area of your course.
- Find the module to which you’d like to add VoiceThread, and click the “Add Content” button.
- Select “External Tool” from the menu.
- Select “VoiceThread” from the list of tools.
- Give your link a title if you’d like.
- Save.
- Click on the new link you’ve just created, and proceed to the instructor support page for details about what comes next.
Graded activities
- Navigate to the “Assignments” area of your course.
- Create a new assignment.
- Name the assignment and write a description if you choose.
- Under Submission Type, select “External Tool”.
- Click on the “Find” button.
- Select “VoiceThread” from the list.
- Save.
- Click on the new link you’ve just created, and proceed to the instructor support page for details about what comes next.
Moodle
If your institution uses Deep Linking
- Go to your course, and turn editing on.
- Click “Add an activity or resource”.
- Click on “External Tool” from the list on the left. If you see “General tool” under External Tool, click on that.
- Click “Add”.
- Name your VoiceThread activity.
- Select “VoiceThread” from the External Tool Type menu. (Note: you may need to click “Show more” if you don’t see this option.)
- Important: Click on the “Select Content” button beneath the External Tool Type menu.
This will launch the VoiceThread Setup Page. Proceed to the instructor support page for details about what comes next.
If your institution does NOT use Deep Linking
- Go to your course, and turn editing on.
- Click “Add an activity or resource”.
- Click on “External Tool” from the list on the left. If you see “General tool” under External Tool, click on that.
- Click “Add”.
- Name your VoiceThread activity.
- Select “VoiceThread” from the External Tool Type menu. (Note: you may need to click “Show more” if you don’t see this option.)
- Save.
- Click on the new link you’ve just created, and proceed to the instructor support page for details about what comes next.
Desire2Learn / Brightspace
If your institution uses Deep Linking
- Navigate to your course.
- Go to the Content area of the course.
- Click “Add Existing Activities”, and select “VoiceThread” from that menu.
This will launch the VoiceThread Setup Page. Proceed to the instructor support page for details about what comes next.
If your institution does NOT use Deep Linking
- Navigate to your course.
- Go to the Content area of the course.
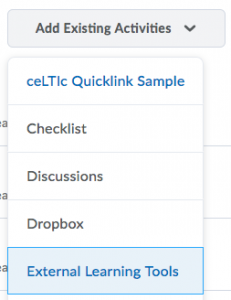
- Click “Add Existing Activities”, and select “External Learning Tools” from that menu.
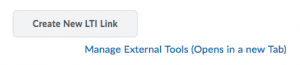
- Click the button labeled “Create New LTI Link”.
- Give your new link a title and enter the URL. Your URL will be formatted as: https://yourdomain.voicethread.com/ltione/
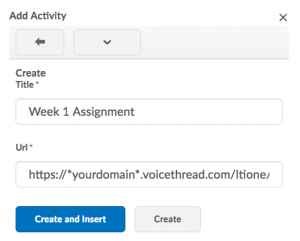
Please contact us if you do not know your domain. - Click “Create and Insert”.
- Click on the new link you’ve just created, and proceed to the instructor support page for details about what comes next.
* If the link you create in this way does not work, your D2L administrator make need to make some changes. Please have that person contact us with any questions. If you skip steps 4-6 above, you might encounter conflicts with VoiceThread’s gradebook integration.
Sakai
If your institution uses Deep Linking
- Navigate to your course.
- Click on the “Lessons” button on the left side of the screen.
- Click “Add Content” at the top of the page.
- Select “Add Learning App” from the menu.
- Click on “VoiceThread”.
This will launch the VoiceThread Setup Page. Proceed to the instructor support page for details about what comes next.
If your institution does not use Deep Linking
To add a VoiceThread activity to your Lesson
- Navigate to your course.
- Click on the “Lessons” button on the left side of the screen.
- Click “Add Content” at the top of the page.
- Select “Add External Tool” from the menu.
- Select “VoiceThread” from the list of tools.
- Give your activity a title.
- Save.
- Click the radio button next to the new activity you just created.
- Click “Use selected item”.
- Click on the new link you’ve just created, and proceed to the instructor support page for details about what comes next.
To add VoiceThread to your course navigation panel on the left
- Navigate to your course.
- Click on the “Site Info” button on the left side of the screen.
- Click “Edit Tools” at the top of the page.
- Check the box next to “VoiceThread”.
- Click “Continue”.
- Click “Finish”.
- Click on the new link you’ve just created, and proceed to the instructor support page for details about what comes next.
Jenzabar
- Navigate to your course.
- Click “Add a Learning Tool”.
- Select “VoiceThread”.
- Click “Activate this tool”.
- Click on the new link you’ve just created, and proceed to the instructor support page for details about what comes next.
PowerSchool / Haiku
- Navigate to your course.
- Click “+Add Content Block”.
- Click on the “Messages and Activities” tab.
- Click “LTI & SCORM”.
- Click on “VoiceThread”.
- Give the activity a title and description.
- Click “Save & Configure”.
- Click on the new link you’ve just created, and proceed to the instructor support page for details about what comes next.
Schoology
- Navigate to your course.
- Select the “Materials” tab from the left menu in the Course Profile.
- Click on the folder to which you’d like to add materials.
- Use the Add Materials dropdown menu at the top to select “Add File/Link/External Tool”, then select “External Tool”.
- Select “VoiceThread” as the tool provider.
- Enter a title for your link.
- Enable grading.
- Click “Submit”.
- Click on the new link you’ve just created, and proceed to the instructor support page for details about what comes next.